Getting Started
Getting Started
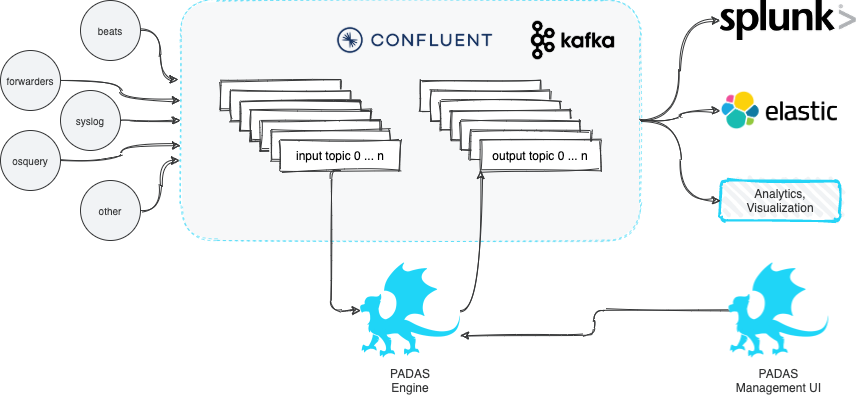
What is PADAS?
PADAS is built on top of robust Confluent Kafka Platform and enables organizations to transform, analyze, and filter TBs of streaming data in real-time. The goal is to keep things simple and take some of the burden away from existing SIEM and Analytics platforms by running various pipelines (combination of tasks that perform transformations and detections). PADAS comes with out-of-the-box integration examples (e.g. Winlogbeat, Splunk) and ready-to-implement rules pertinent to MITRE ATT&CK Framework. Any other custom rules can also be added (via PDL) without any dependency to existing SIEM or Analytics infrastructure.
Components
Padas has 2 main components:
1. Manager UI: All configuration changes (CRUD - Create, Read, Update, Delete operations) can be performed through Manager web interface. This is an optional but recommended component to manage configurations through Engine API.
2. Engine: Reads configurations from existing Padas topics and runs assigned (based on group setting) and enabled topologies. Each topology reads from a single source topic, runs one or more pipeline(s), and writes the resulting outputs to one or more output topic(s). Each pipeline consists of one or more task(s) where each task can perform a filter, transform, enrichment, or detection (rules) function. Please see below for details on concepts.
A Manager UI can be configured to connect to a single Engine component. Engine components can be scaled up or down as needed with group assignments to distribute work-load.
Basic Concepts
Let's take a closer look at Padas configuration and engine's processing concepts. At a high-level, Padas Engine reads an input topic, processes data (pipelines and tasks) and writes to one or more output topics.
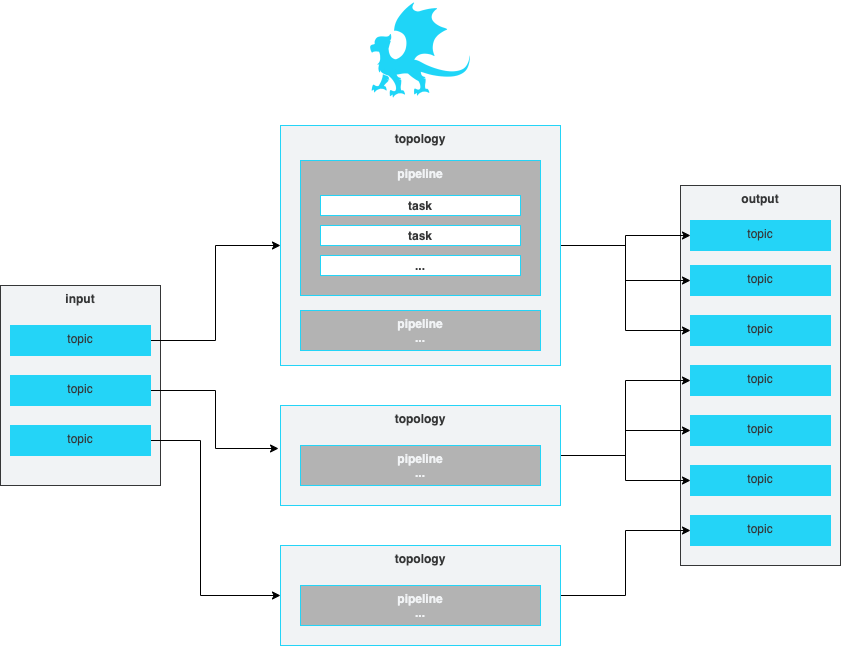
Topologies, Pipelines, Tasks
Quick start
This quick start guide assumes all components (Confluent Kafka and Padas) will be installed on the same machine. In production, it is recommended to separate out these components on different nodes/hosts.
This quickstart consists of the following steps: 1. Step 1: Download and define components 2. Step 2: Start Manager 3. Step 3: Start Detect Engine 4. Step 4: Start Transform Engine 5. Step 5: Generate Events 6. Step 6: View Alerts
Prerequisites
- Internet connectivity
- Supported Operating System
- A supported version of Java. Java 8 and Java 11 are supported in this version.
- Confluent Kafka must be installed and running (locally) as described in Quick Start for Confluent Platform. You should have at least the following services up and running.
confluent local services status
...
Kafka is [UP]
Schema Registry is [UP]
ZooKeeper is [UP]
...
Overview of Quickstart
Below diagram shows what will be accomplished with this quick start guide.
Step 1: Download and define components
1. Download the latest version (e.g. padas-{{ site.data.versions.latest_version }}.tgz)
2. Use the tar command to decompress the archive file
```sh
tar -xvzf padas-{{ site.data.versions.latest_version }}.tgz
```
-
Since we have everything on a single host, make a copy of the extracted folder for manager, transform engine, and detect engine
NOTE: Last renaming step is not necessary but gives a descriptive name to the folder's functionality. 4. Edit manager properties (cp -r padas padas-manager cp -r padas padas-transform mv padas padas-detectpadas-manager/etc/padas.properties) to make sure thepadas.instance.roleis set tomanagerandpadas.licenseis set to the license you received.vi padas-manager/etc/padas.properties ...After editing, properties file (
padas-manager/etc/padas.properties) entries should be:5. Edit transform properties (padas.instance.role=manager bootstrap.servers=localhost:9092 schema.registry.url=http://localhost:8081 padas.license=<LICENSE KEY SHOULD GO HERE>padas-transform/etc/padas.properties) to make sure thepadas.instance.roleis set totransform.vi padas-transform/etc/padas.properties ...After editing, properties file (
padas-transform/etc/padas.properties) entries should be:6. From your current working directory, now you should have 3 PADAS folders, e.g.padas.instance.role=transform bootstrap.servers=localhost:9092 schema.registry.url=http://localhost:8081Note that you don't have to make any configuration changes tols padas-detect padas-manager padas-transformpadas-detectfolder, as the default behavior is set to Detect Engine with localhost.
At this stage, make sure you have Confluent Kafka running locally as mentioned in prerequisites.
Step 2: Start Manager
1. Start manager node on the console. The script will ask you to accept the license agreement (enter y) and define an administrator user to login; enter the desired password to continue
cd padas-manager/
<img src="/assets/img/login_sample.png" width="67%">
-
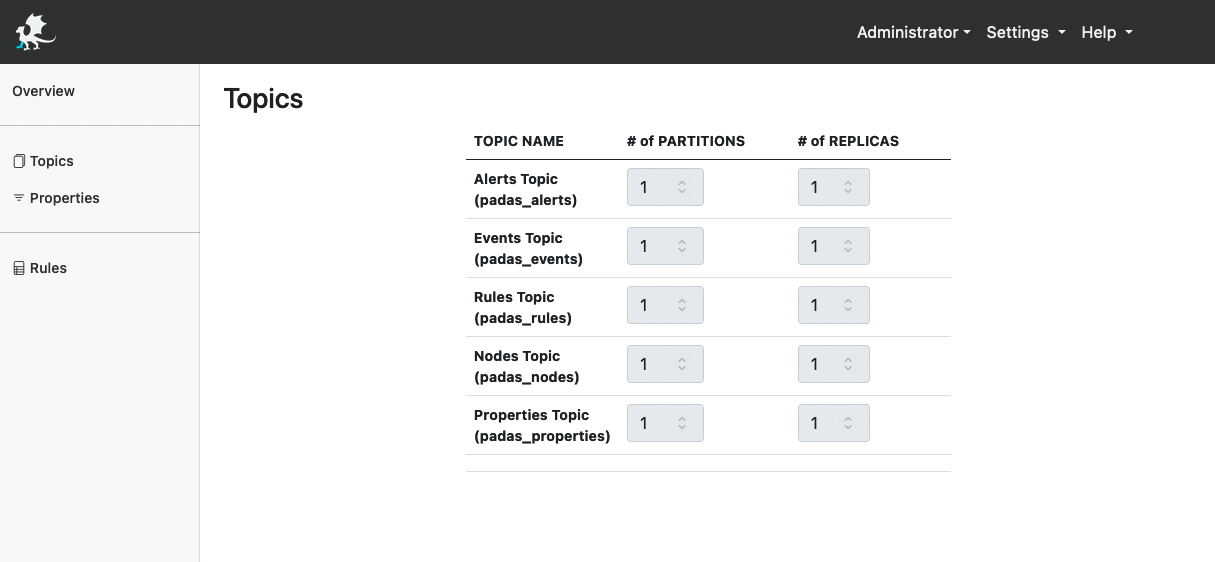
Create Topics: Upon initial login, Manager will go to Topics menu in order to create necessary Kafka topics.
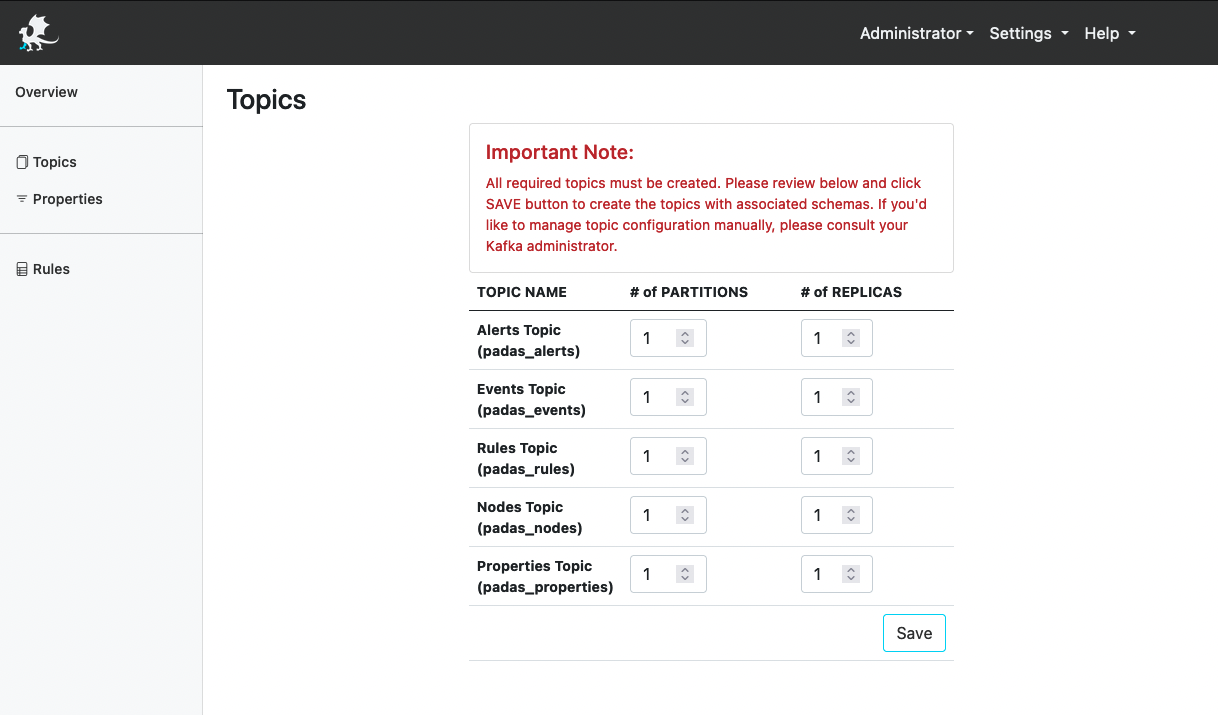
Hit Save button to continue with defaults.
-
Create a Rule: Go to Rules menu link in order to add a sample rule. Enter the following values for the required fields:
- Rule Name:
Test Rule - PDL Query:
field1="value" - Datamodel List:
testdm
Other provided fields are optional but feel free to review and add/modify as needed. A list of rules for MITRE ATT&CK can be found here: padasRules.json
Hit Save button to continue.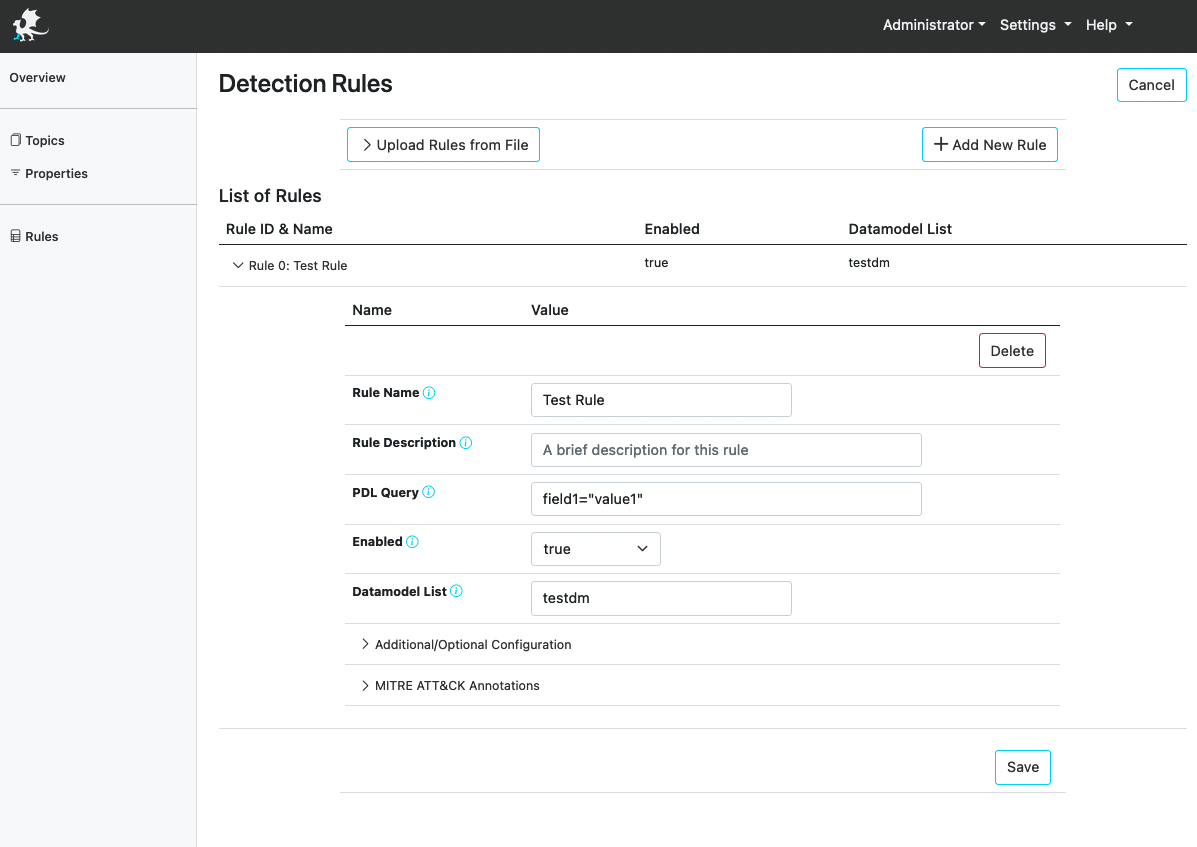
You should be able to view the rule you specified, similar to the following screenshot.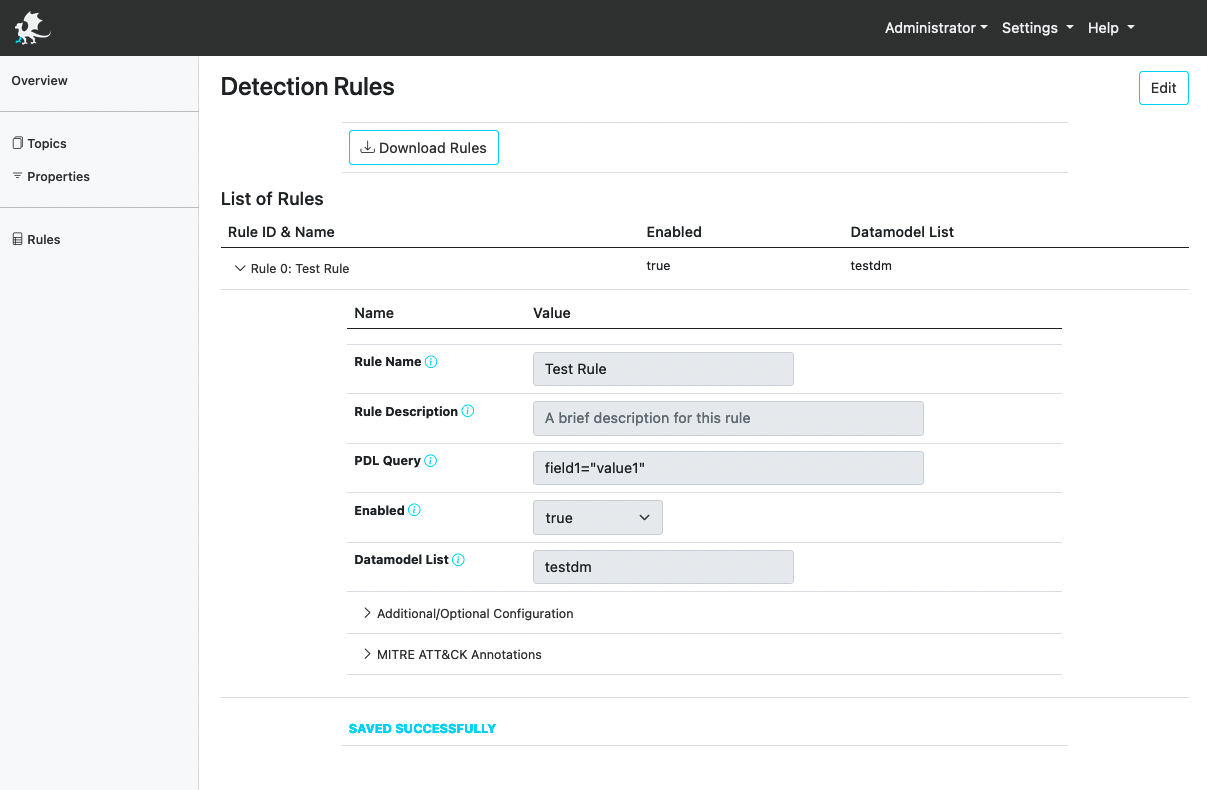
- Rule Name:
-
Add a Transformation: Go to Properties and first hit Edit, then select Add New Transformation. Expand "Input Topic: 0" and enter the following values for the required fields:
- Topic Name:
testtopic - Datamodel Name:
testdm
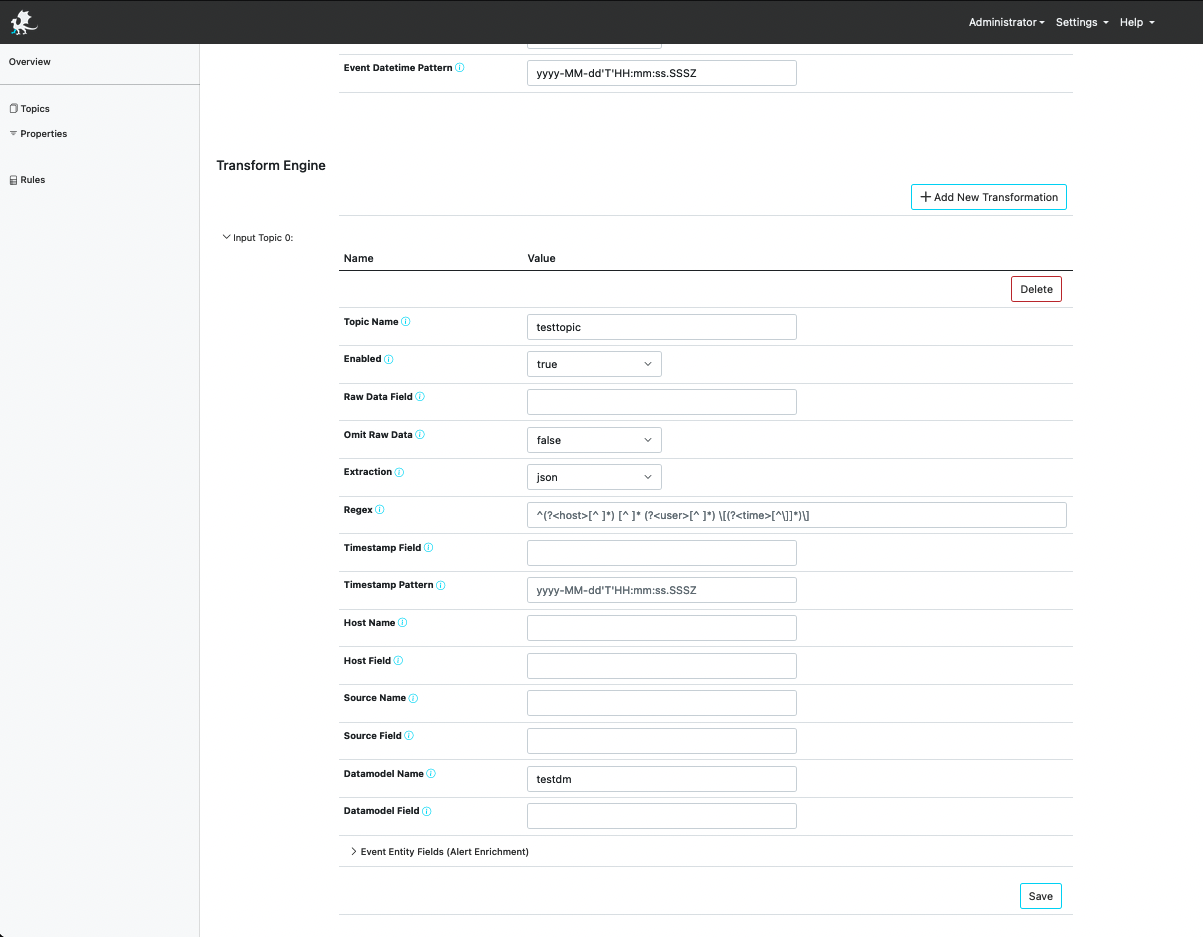
You should be able to view the newly added property (Input Topic: testtopic, similar to the following screenshot.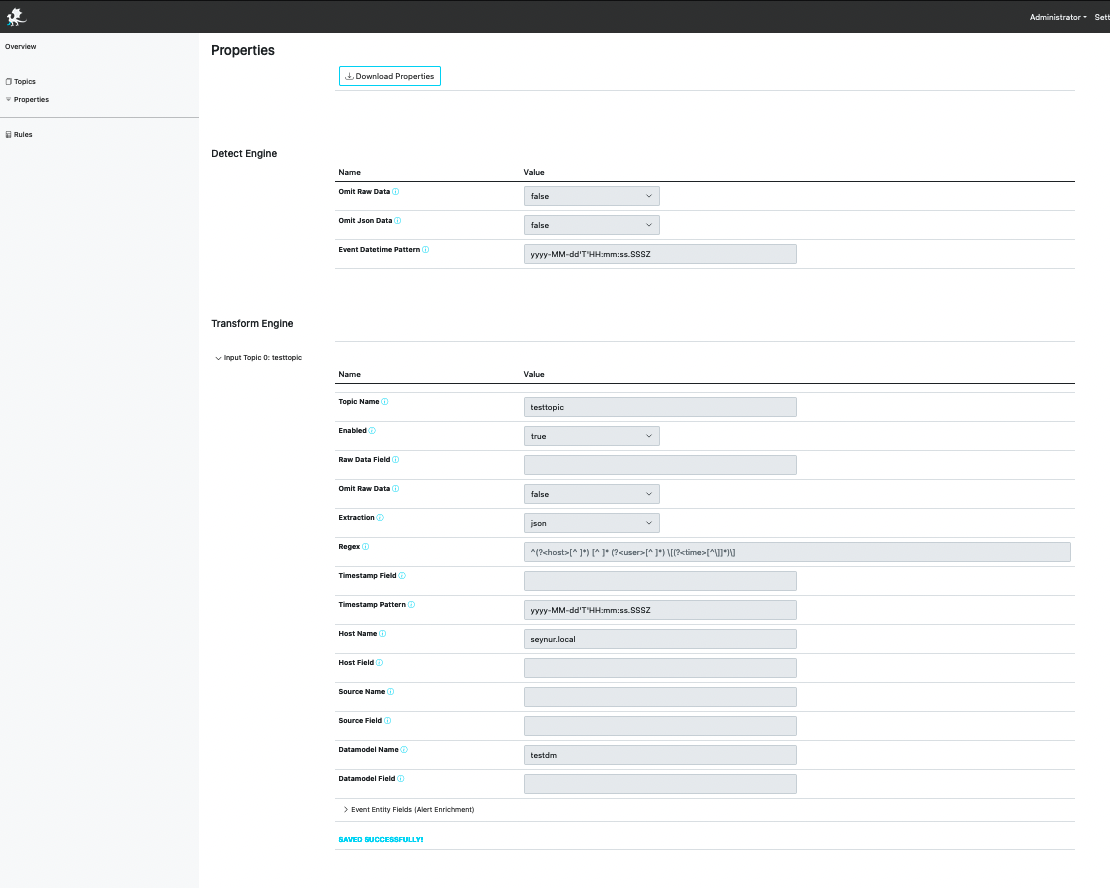
- Topic Name:
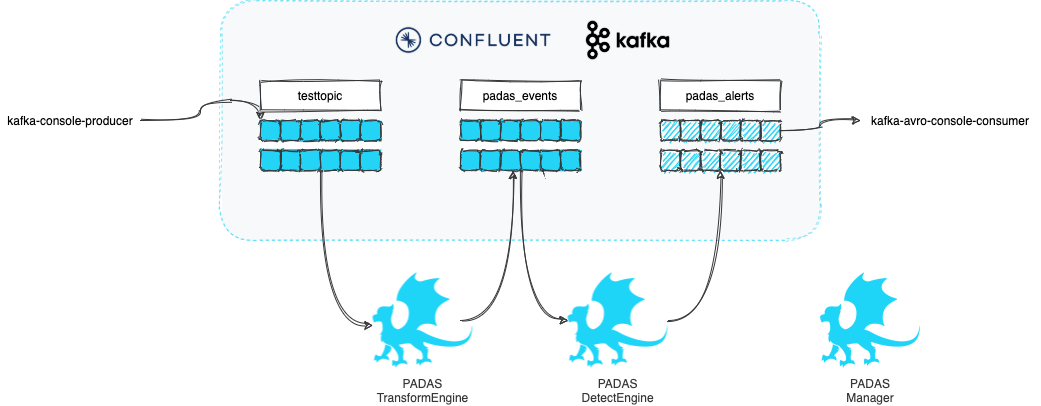
Step 3: Start Detect Engine
1. Start Detect Engine on the console (separate window, since Manager is running on the console as well). The script will ask you to accept the license agreement (enter y).
cd padas-detect/
Step 4: Start Transform Engine
1. Before starting Transform Engine we must first create the specified input topic (i.e. testtopic) in Kafka. You can do this from Confluent Control Center or from the console as shown below.
```sh
kafka-topics --create --bootstrap-server localhost:9092 --topic testtopic --partitions 1 --replication-factor 1
Created topic testtopic.
```
- Start Transform Engine on the console (separate window, since Manager and Detect Engine are running on the console as well). The script will ask you to accept the license agreement (enter
y).cd padas-transform/
Step 5: Generate Sample Event
- Let's generate a sample event with a simple JSON message. Note that this JSON will match the PDL (
field1="value1") specified above.echo '{"field1":"value1","field2":"value1"}' | kafka-console-producer --bootstrap-server localhost:9092 --topic testtopic
Step 6: View Alerts
-
Once the sample event is ingested, PADAS Detect Engine will run the rules for matching datamodels in real-time and populate
padas_alertstopic with matching event and alert information. You can simply view this alert with the following command:kafka-avro-console-consumer --bootstrap-server localhost:9092 --topic padas_alerts --from-beginning | jqOutput will be similar to the following. Note the use of
jqabove for pretty display of JSON data.{ "timestamp": "2021-11-28T14:25:23.199+0300", "name": "Test Rule", "description": "", "references": null, "customAnnotations": null, "mitreAnnotations": null, "platforms": { "string": "" }, "domain": "mitre_attack", "analyticType": { "string": "" }, "severity": { "string": "" }, "datamodelReferences": null, "events": [ { "timestamp": "2021-11-28T14:18:30.309+0300", "datamodel": "testdm", "source": "unknown", "host": "padas.local", "src": null, "dest": null, "user": null, "rawdata": "{\"field1\":\"value1\",\"field2\":\"value1\"}", "jsondata": "{\"field1\":\"value1\",\"field2\":\"value1\"}" } ] }
Next Steps: - Install in production. - Utilize PADAS with out-of-the-box padasRules.json - Integrations with ingest pipelines (Sample Sysmon Config with Winlogbeat) and ready-to-use transformations (Winlogbeat Sysmon and Security)